I’ve been looking at Pinterest, and two things caught my eye. First was an idea to use wire cubes for scrapbook paper by putting shelves close together instead of only connecting at the corners. A good example can be found here. Of course, then I saw another idea, similar. You know, a person with a watch knows what time it is; a person with two watches is never sure. So I decided to try to concoct a diy one that used the cubes but incorporated the slanted shelves with a lip at the bottom. I’ll tell you, it was an experiment, and some things went wrong, but it was instructional.


I started with these basic items: wire storage cubes, these vinyl coated closet shelves (I offer the link for information only. You can do much better at Home Depot), and a lot of zip ties. The size of the zip ties doesn’t matter much, as long as they are strong. (I don’t recommend the ones from the dollar store.)

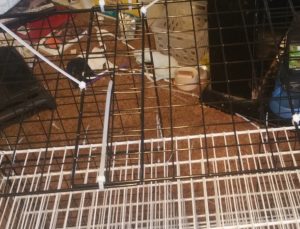
I began by cutting the shelves into three foot segments, with a 4mm wire/bolt cutter. Then I began connecting the (black) sides to the (white) bottom shelf. (The color difference is for no particular reason; I got the black storage cubes from Amazon Warehouse, and that’s the color that was marked down.) The front of the shelf was attatched to the bottom frame wire of the side panel, with the lip pointing up. The back was attatched to the second wire from the bottom, creating a slant.
Because the shelf is 12″ and the panels are 14″, there was extra panel, which I let stick out in the back.

I continued by doing the same thing to the other side. The next shelf was likewise slanted, with each attachment two grids up instead of one. One leaves no hand room for removing paper. I continued until I had four shelves.


That’s when I made Big Mistake number One.
I attatched the back panels right against the back of the shelves rather than to the back part of the side panel frames.
(If I had done that, I would have had to connect them with a third panel, overlapping the other two back panels. This is what I did on the bottom, which you will see below)
 I topped it with a level shelf, with the lip tipping over in back.
This is where it gets complicated, and I wish I had kept it simpler. I wanted it two story. I wanted a bottom level that is taller, and flat, not slanted, for storing paper still in the pads. I turned it over to add that. Because everything was now upside down, it kind of got confusing. But basically, I added one shelf two grid levels down from the bottom (top now) of the unit, and surrounded it with the black panels on either side and the back. I left the center extra space open, as the frames of the two panels were already supporting it. Because it was upside down, I had to count the two grids and then hang it from the top, rather than setting it on top of the wire. It felt counter intuitive, and I had to keep reminding myself to hang the shelves. Note to self: next time, do it from the bottom up, right side up.
 Oops! I accidentally cut in the wrong place. Duct tape to the rescue!
I kept the zip ties loose until I had the shape formed, so I would have the room to adjust them to make them align well. 

Just as well, because I had to cut them off when I realized I had attatched the side corner all wrong. I had attatched the top of the back panel to the top of the side panel. But I had attatched the bottom of the back panel to the back of the shelves. Oy!
Then, after putting the bottom shelf on top (I would have put two but I ran out of three foot shelves) I placed the bottom panels.
I used extra reinforcement for the place with the cut wire, reinforcing on either side of the cut.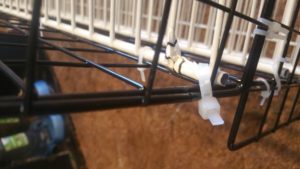
And here’s the finished unit, with paper on it. Sorry for the late afternoon glare.

So, what did I learn?
Well, first of all, the papers did not fit perfectly. They kind of curled up in the back a little. Not enough, I think, to damage the papers; but I wish the fit were more comfortable. If I did it again, I would not put the back panel right up against the shelves. It would be slightly less sturdy, but would work better. I actually had considered cutting the black panels to size, but decided not to, because the frame wires of the panels are considerably thicker and more supportive than the grid wires, and I didn’t want to lose part of the frame.
The second thing I discovered was that I didn’t find the slant and lip very important. The unit would have been far easier to build, and more versatile for other uses if I had simply done the shelves flat, like in the first picture I saw.
Finally, the biggie. The space I had planned to put it was about 36 3/4″, and I couldn’t get the 36″ unit into the space, so I had to find a different place for it. This was incredibly disappointing.
The unit works, and I am glad of that. I got to use a bolt cutter for the first time, and that was, well, empowering. And now that I know what mistakes I made, I can do better next time. Hopefully, you learn from my mistakes so you don’t need to make them yourself. There will be a next time, I am certain. Once I catch my breath from the work that went into this, I plan to make a 22″ wide unit with the leftover parts. I will probably condense my papers to that unit, and take apart the other one to make it right. There is no way it’s going to house three stacks per row, so I will just use the third row for narrower papers. This is the beauty of using zip ties. They are very affordable to cut off and redo.
One further note. A lot of people are simply doing the 14″ cubes with shelves inside, and it’s working great. The only reason I didn’t do it that way is that space is at such a premium in my office that I couldn’t stand to waste the extra space. Plus, I could only fit two wide, and I would have a tall area beside it that would be of very little use. I wanted to use the full width of the shelving unit I am putting them on once fixed.
And that is the story of my first attempt. Do I feel foolish for having made mistakes? Absolutely not! Learning is just one more stepping stone in #BecomingYes. I used to say I can’t. Now I say I will.